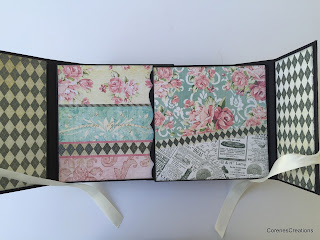
Hello! Thanks for stopping by! Here is a 6 1/4" x 6 1/4" x 3" gatefold mini album!
I've used the gorgeous DCWV The Primrose 12x12 Collection.
This album has 12 pocket-style pages (24 total).
Each pocket holds a bracket-style pull out mat for more photos.
I've added a couple of bracket-style flip outs for more photos.
I have a full, detailed video tutorial on this album, from start to finish on my YouTube Channel.
Here's the link if you'd like to check it out: https://youtu.be/k0dkoACjvGA
Thanks for stopping by!
As promised in the video, here are the measurements:
Gatefold Mini Album Measurements in inches.
For a step by step tutorial, check out my YouTube Channel!
Chipboard Covers:
(1) 6 1/4 x 6 1/4 for back cover
(2) 6 1/4 x 3 1/8 for front cover
(2) 6 1/4 x 3 for spine
Cardstock wrap around outside chipboard (65 lb weight):
(2) 7 1/4 x 11 (overlap by 1/2")
Hinges (you will be making two):
(2) 5 7/8 x 8 1/2 score every 1/2"
Tyvek (optional):
(4) 5 7/8 x 1 1/2
Pocket Pages:
(12) 6x6 (slightly smaller) this is for your back side
(12) 7 1/4 x 6 score at 5/8, flip, score at 5/8 on the 7 1/4" side. Miter corners
Inside Mat piece for your Cover:
(2) 6 1/8 x 10
Flip Pages (optional):
6 5/8 x 6 score at 5/8 on the 6 5/8" side (border die optional)
Smaller Flips: Scallop: 5 1/4" Bracket: 4 3/4 x 5 (1/2" tab)
Pockets for your album:
7 1/4 x 4 1/8 (choose what ever height you prefer, use a border die if you'd like) score at 5/8" on both
right & left side on the 7 1/4" side
Mats for side pockets:
(12) 5 3/4 x 5 1/2
Patterned Paper for your pages:
5 7/8 x 5 7/8
Inside front cover mat (patterned paper):
(2) 6 x 2 7/8
Outside album patterned paper pieces:
Spine: (2) 6 x 2 7/8
Back cover: 6 1/8 x 6 1/8
Front Cover: 6 1/8 x 6 1/8 cut in half


As always, just beautiful! You are very talented. I enjoy all of your tutorials!
ReplyDeleteThat means so much to me...thank you for such a sweet comment!
DeleteCorene
Gracias por compartir muy lindo
ReplyDeleteThank you so much for this amazing Tutorial! Its absolutely stunning. I think im going to attempt it as a wedding gift for my maid of honour who has just got married this past weekend( yes a bit late!)
ReplyDeleteI have a quick question, and you may not remember or you may have used a different size, but im looking at buying 12x12'' sheets for the structure of the book, do you remember/know how many sheets you used? or did you use A4 card stock? Sorry i have watched the whole thing but i thought, especially for the cover i would check. Sasha
Also, can i please ask what thickness of card stock you used? Ive got some very thick stuff in a pearlised ivory, but im starting to think it might be too thick to make the album bend, but really dont want it to be to think and rip at all.
DeleteSasha
Hello! I use 65lb weight cardstock. It is thick...but not too thick. If the paper you are using is too thick, it will tend to crack. I also cannot recall how much paper I've used, but I can tell you one pack of 50 sheets of 8 1/2" x 11" should be more than enough. I usually use 8 1/2" x 11". Hope this helps. Have fun!
DeleteCorene
Thank you love all your tutorials. Your designs are easy to follow. Just one question in UK we go by gsm for our card stock weight do you know what your 65lb would be in gsm?
ReplyDeleteKind regards
Alison
I believe its around 100 gsi, if you can afford to I'd use adorable scorable by Honky Dory, you can go thicker and it won't crack.
ReplyDeleteI just loved this album tutorial! I had so much fun and learning doing it. I'm using an old paper pad: Maggie Holmes Bloom that turned out to be perfect for it. Excellent instructions and visuals :)
ReplyDeleteI just love your teaching methods. Again, thank you! This is a great way to use your papers wisely, with little to no waste. Yay!
ReplyDelete